Introduction
Microsoft has a fair amount of documentation on Localisation, but the content is mixed up with the various type of Blazor deployment models, and is missing some steps. It also tends to jump around. I’m going to cover implementing localisation in a way that will allow the language to be set based on the user’s browser settings, but also allow the user to set a language which will override the browser setting, and be persisted between sessions. This post also covers using the excellent ResXManager extension that makes it straightforward to use online services to quickly get translations for your text. Getting translations from real people who understand the context of where the text will be used is much better, but for getting started, online services can do the job.
Setting up the project
We’re going to start with the default Blazor WASM standalone application, using .NET 9 which is the latest at the time of writing. You can follow along by downloading the source from GitHub and checking out the getting-started branch. To get the completed application, check out the HEAD of the master branch. When running the application, you’ll see the usual sample pages that come with the template:
Implementing IStringLocalizer
The first thing to do, is to add the Microsoft.Extensions.Localization NuGet package to the Blazor WASM project. Once the NuGet package is installed, go to Program.cs and add the following line before the await builder.Build().RunAsync(); line.
builder.Services.AddLocalization();
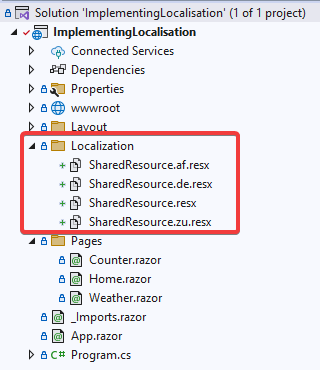
Next, you need to add some translations to use. Create a folder called Localization in the root of the Blazor WASM project, and then create a new file called SharedResource.resx. Create more .resx files for all the languages that you want to support using the filename SharedResource.xx.resx, where xx is the language’s code. For this example, I will support Afrikaans (af), Zulu (zu) and German (de) as additional languages, so I created three additional files:
- SharedResource.af.resx (Afrikaans)
- SharedResource.de.resx (German)
- SharedResource.zu.resx (Zulu)
You can find the codes here: Country Code Language List
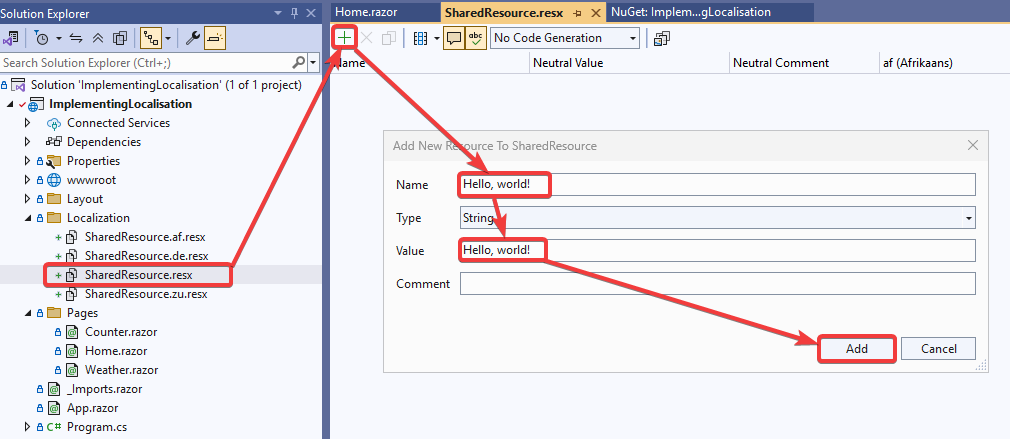
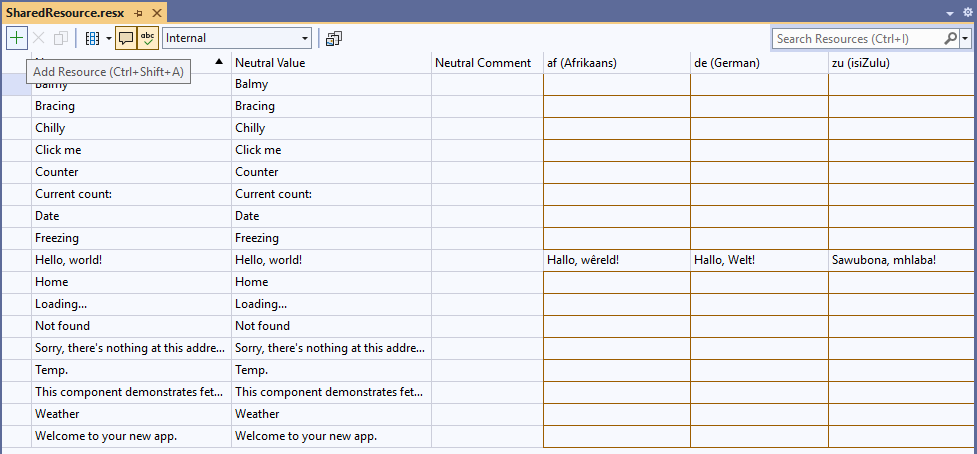
Add an example translation to ensure the translations work. Later, we’ll add translations from an online service. Add an entry to the SharedResource.resx file for “Hello, world!”.
Once that’s done, manually add the translations for the other languages:
- af (Afrikaans): Hallo, wêreld!
- de (German): Hallo, Welt!
- zu (Zulu): Sawubona, mhlaba!

Set the Code Generation of the resource file to Internal. You can also use Public if the resources will be used by other projects.

On the Home.razor page, where this string is used, inject the IStringLocalizer:
@inject IStringLocalizer<SharedResource> L
You can use any name that you want, but I find L to be intuitive and short – this will appear almost everywhere that you insert a string, so you don’t want it to be a long name, cluttering your code.
Replace the “Hello, world!” text with a reference to the string from the resources.
<h1>@L["Hello, world!"]</h1>
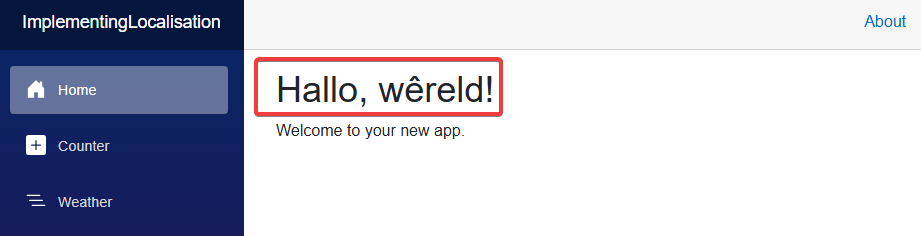
If you run the application, using a browser with one of the languages from your resources set as a preferred language above English, you’ll see the translated text shown.
For example, If your browser is set to prefer Afrikaans, you will see the following:
Using the ResXManager extension
We’re going to add the rest of strings to the ShareResource files, and we’re going to use the ResXManager extension to quickly generate translations for all the languages.
You need to download and install the extension in Visual Studio before continuing.
Once the extension is installed, open the resource files and add the following entries, while at the same time, referencing them in the razor files in place of the raw string. One special case is when replacing the string in the forecasts (Weather.razor). The code is referencing a variable, not a raw string so don’t use double-quotes:
<td>@L[forecast.Summary]</td>
In the resource file, make the name and value the same:
- Home
- Welcome to your new app.
- Counter
- Current count:
- Loading…
- Weather
- This component demonstrates fetching data from the server.
- Date
- Temp.
- Freezing
- Bracing
- Balmy
- Chilly
- Not found
- Sorry, there’s nothing at this address.
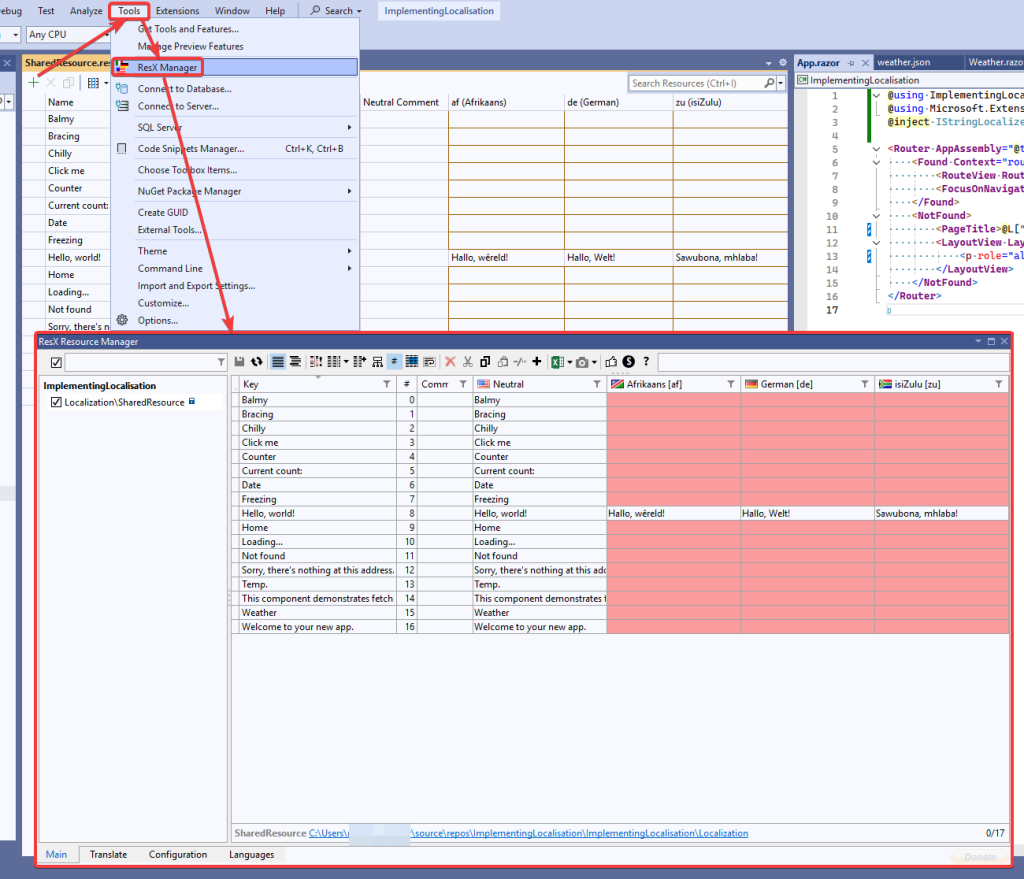
In Visual Studio, go to Tools ➡️ ResX Manager and you’ll see all strings together with the languages in red where no translation exists.
At the bottom of the window is a Translate tab. In this tab you can choose your translation service. The Google Lite and MS Terminology options require no registration or API key so they’re the easiest to get started with.
Select one of them, and then click Start. It might take a few minutes to process all the strings.
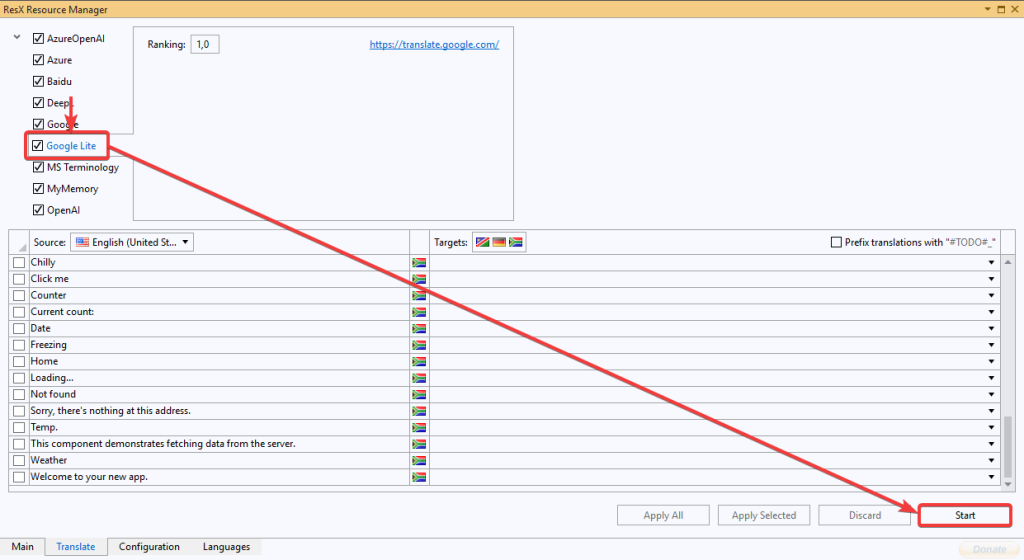
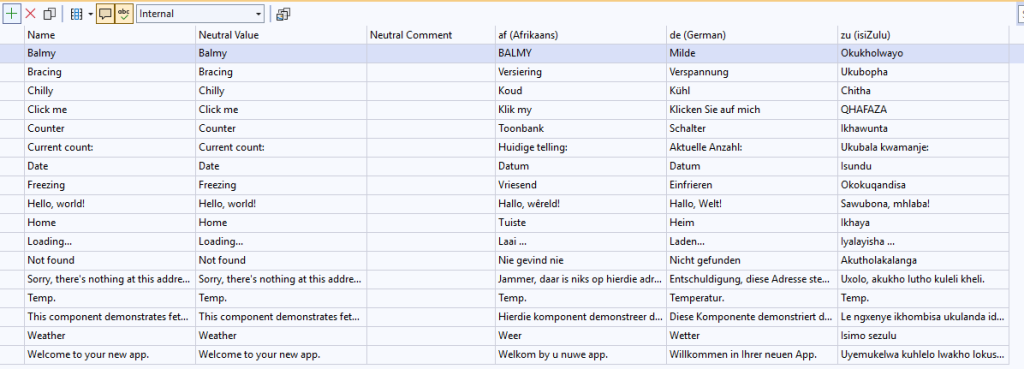
When it’s done, you can select which translations to apply, or apply all of them with Apply All. If you now open the resource files, you’ll see all the translations have been filled in.
Anytime that you need to add new translations, you can follow this process.
Finally, run the application and see the changes. If you don’t see a change, make sure your browser’s first language is set to one of your languages and not English.
In the next section, we’ll look at how a user can change the language themselves via the UI without having to change browser settings, and how to persist that change.
Changing languages dynamically at runtime
While localisation is working, users might want to use a language that is different from the setting set in their browser. To support this, we need to provide a UI for users to make a language selection, and then dynamically update the application to use the new language. We also need to store which language the user selected so that the language does not reset when the page reloads. We’ll start with implementing the UI.
Create a CultureSelector.razor Blazor component in the Localization directory. .NET works internally with cultures and not languages, so I have chosen the name CultureSelector and not LanguageSelector. Add the following code to the component.
@using System.Globalization
@using Microsoft.Extensions.Localization

@inject NavigationManager _navigationManager
@inject IJSRuntime _jsRuntime

<p>
    <label>
        <svg xmlns="http://www.w3.org/2000/svg" width="16" height="16" fill="#ffffff" class="bi bi-translate" viewBox="0 0 16 16">
            <path d="M4.545 6.714 4.11 8H3l1.862-5h1.284L8 8H6.833l-.435-1.286zm1.634-.736L5.5 3.956h-.049l-.679 2.022z" />
            <path d="M0 2a2 2 0 0 1 2-2h7a2 2 0 0 1 2 2v3h3a2 2 0 0 1 2 2v7a2 2 0 0 1-2 2H7a2 2 0 0 1-2-2v-3H2a2 2 0 0 1-2-2zm2-1a1 1 0 0 0-1 1v7a1 1 0 0 0 1 1h7a1 1 0 0 0 1-1V2a1 1 0 0 0-1-1zm7.138 9.995q.289.451.63.846c-.748.575-1.673 1.001-2.768 1.292.178.217.451.635.555.867 1.125-.359 2.08-.844 2.886-1.494.777.665 1.739 1.165 2.93 1.472.133-.254.414-.673.629-.89-1.125-.253-2.057-.694-2.82-1.284.681-.747 1.222-1.651 1.621-2.757H14V8h-3v1.047h.765c-.318.844-.74 1.546-1.272 2.13a6 6 0 0 1-.415-.492 2 2 0 0 1-.94.31" />
        </svg>
        <select @bind="selectedCulture" @bind:after="ApplySelectedCultureAsync">
            @foreach (var culture in supportedCultures)
            {
                <option value="@culture">@culture.NativeName</option>
            }
        </select>
    </label>
</p>

@code
{
    /// <summary>
    ///  Array of supported cultures.
    /// </summary>
    private CultureInfo[] supportedCultures = new[]
    {
        new CultureInfo("en"),  // English
        new CultureInfo("af"),  // Afrikaans
        new CultureInfo("de"),  // German
        new CultureInfo("zu"),  // Zulu
    };

    /// <summary>
    ///  Currently selected culture.
    /// </summary>
    private CultureInfo? selectedCulture;

    /// <summary>
    ///  This method is called when the component is initialized.
    /// </summary>
    protected override void OnInitialized()
    {
        selectedCulture = CultureInfo.CurrentCulture;
    }

    /// <summary>
    ///  Applies the selected culture.
    /// </summary>
    private async Task ApplySelectedCultureAsync()
    {
        if (CultureInfo.CurrentCulture != selectedCulture)
        {
            await _jsRuntime.InvokeVoidAsync("jsinterop.localStorage.setItem", "CultureSelection", selectedCulture!.Name);

            _navigationManager.NavigateTo(_navigationManager.Uri, forceLoad: true);
        }
    }
}
This creates an SVG image of the Bootstrap Icons Translate icon with a select box to choose the language you want to set. When the component is initialised, it will be set to what the current culture is, and when a new culture is set, the current culture is updated, and then persisted to local storage with JS Interop. The JS Interop to do this is:
var jsinterop = jsinterop || {};

jsinterop.localStorage = {
    getItem(key) {
        var serializedItem = localStorage.getItem(key);
        var item = JSON.parse(serializedItem);
        return item;
    },
    removeItem(key) {
        localStorage.removeItem(key);
    },
    setItem(key, item) {
        serializeditem = JSON.stringify(item);
        localStorage.setItem(key, serializeditem);
    }
}
The getItem method will be used soon to retrieve the culture when the application loads. Ensure you add a line to your index.html file to load the jsinterop.js file.
<script src="jsinterop.js"></script>
In NavMenu.razor add the culture info component under the navbar-toggler button.
<div class="top-row ps-3 navbar navbar-dark">
    <div class="container-fluid">
        <a class="navbar-brand" href="">Implementing Localisation</a>
        <button title="Navigation menu" class="navbar-toggler" @onclick="ToggleNavMenu">
            <span class="navbar-toggler-icon"></span>
        </button>
        <CultureSelector />
    </div>
</div>
If you run the application, you’ll see the option to select your language in the menu, but after setting the language, there is no change. This is because after loading, the browser setting is reapplied. We need to update the application to check local storage on start first, and if another language is saved, to apply it.
Create a new class called CultureExtensions and add the following code to it:
/// <summary>
/// Provides extension methods for culture-related operations in WebAssembly applications.
/// </summary>
public static class CultureExtensions
{
    /// <summary>
    /// Sets the default UI culture for the WebAssembly application based on stored preferences.
    /// </summary>
    /// <param name="host">The WebAssembly host instance.</param>
    /// <returns>A task representing the asynchronous operation.</returns>
    /// <remarks>
    /// This method checks the browser's local storage for a previously selected culture.
    /// If no culture is found, it defaults to "en" (English).
    /// The method sets both the current thread's culture and UI culture.
    /// </remarks>
    public static async Task SetDefaultUICulture(this WebAssemblyHost host)
    {
        IJSRuntime jsRuntime = host.Services.GetRequiredService<IJSRuntime>();

        string? result = await jsRuntime.InvokeAsync<string>("jsinterop.localStorage.getItem", "CultureSelection");

        CultureInfo culture;

        if (!string.IsNullOrWhiteSpace(result))
        {
            culture = new CultureInfo(result);
        }
        else
        {
            culture = new CultureInfo("en");
        }

        CultureInfo.DefaultThreadCurrentCulture = culture;
        CultureInfo.DefaultThreadCurrentUICulture = culture;
    }
}
This is a utility class that will handle setting the language when the application starts. It provides functionality to set the default UI culture based on user preferences stored in the browser’s local storage.
We’ll use it in Program.cs, but to do that, we first have to modify the await builder.Build().RunAsync(); call to first return a WebAssemblyHost that we can run the extension method off of.
The changes are:
WebAssemblyHost host = builder.Build();
await host.SetDefaultUICulture();
await host.RunAsync();
There is one final change that we need to make. In order to support changing cultures dynamically at startup, all the globalisation data needs to be loaded and this is not enabled by default. To enable it, add the following line to the .csproj file in the <PropertyGroup></PropertyGroup> tags.
<BlazorWebAssemblyLoadAllGlobalizationData>true</BlazorWebAssemblyLoadAllGlobalizationData>
With this change in place, let’s run the application.
There you have it. A completely localised Blazor Web Assembly application. You can get all the code up to here by checking out the master branch.