Introduction
.NET MAUI is Microsoft’s cross-platform desktop and mobile application framework that is the evolution of Xamarin. One major feature introduced in MAUI is MAUI Blazor. This allows you to run a Blazor WebAssembly (WASM) application within an embedded MAUI WebView component, making it run the same as a native application. This application also uses the native .NET runtime on the device and not the WASM-based runtime environment. Another major advantage of this approach is that code can almost be 100% shared between the front-end of a Web application and the mobile applications.
This blog post will take you through setting up a sample MAUI application that can run on normal web browsers using Blazor WASM, or on any MAUI-supported platform using MAUI Blazor. I recommend you use the latest version of Visual Studio, at least version 2022.
As usual, all the code from this post is available on GitHub.
Solution set up
We’ll make use of three projects:
- Blazor project for normal Web Browsers.
- MAUI project for the MAUI applications.
- Shared project for sharing UI between the Blazor and the MAUI project.
Open Visual Studio (I’m using Visual Studio 2022) to begin.
Blazor project
Choose the option to Create a new project. Search the templates for the Blazor WebAssembly App template and select it, then click Next.

Set the Project name. Then set the Solution name and click Next.

Select the Framework (the latest version is likely the best, which was .NET 7.0 for me). Leave the rest of the default options as they are and click Create.

MAUI Project
In Visual Studio, go to File -> New -> Project to bring up the Create a new project dialog box. Then search for the .NET MAUI Blazor App template, select it and click Next.

Set the Project name, and set Solution to Add to solution, then click Next.

Select the Framework (the latest version is likely the best, which was .NET 7.0 for me). Leave the rest of the default options as they are and click Create.

Razor Class Library Project
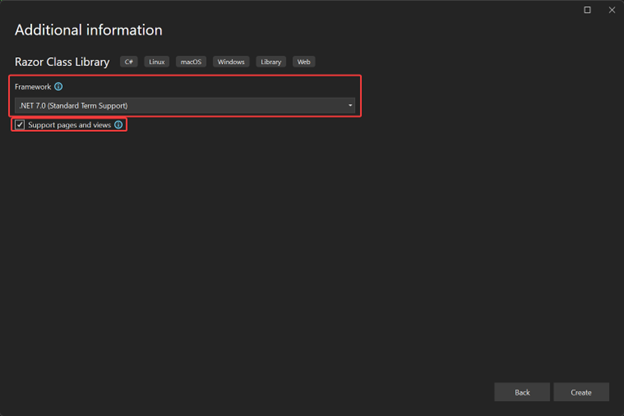
In Visual Studio, go to File -> New -> Project to bring up the Create a new project dialog box. Then search for the Razor Class Library template, select it and click Next.

Set the Project name, and set Solution to Add to solution, then click Next.

Select the Framework (the latest version is likely the best, which was .NET 7.0 for me). Also, check the box for Support pages and views, then click Create.
You should now have three projects in the solution:

Set up the shared project
The Razor Class Library project will be stored the shared application code. Delete the Areas folder from the Razor Class Library project.

Copy the following files and folders from the Blazor WASM project to the Razor Class Library project.

Then, remove the “files” in the Shared project’s wwwroot folder.

Add the following NuGet packages:
- Microsoft.AspNetCore.Http
- Microsoft.AspNetCore.Components.Web
Modify the _Imports.razor file so that it has the following using statements. Note the last statement must be the name of your SharedUI project.
@using System.Net.Http
@using System.Net.Http.Json
@using Microsoft.AspNetCore.Components.Web
@using Microsoft.AspNetCore.Components.Web.Virtualization
@using Microsoft.JSInterop
@using SharedUI.Shared
Remove the <AddRazorSupportForMvc> and include Microsoft.AspNetCore.App references.

You should now be able to build the project.
Set up the Blazor WASM project
Delete the Pages, Shared and _Imports.razor files and folders.

Add a project reference to the Razor Class Library.
Open the App.razor file. Add the following statements to the top of it:
@using Microsoft.AspNetCore.Components.Routing
@using Microsoft.AspNetCore.Components.Web
@using SharedUI.Shared;
Modify the <Router> opening element to add an additional assembly, with a reference to the MainLayout file in the shared project.
<Router AppAssembly="@typeof(App).Assembly"
        AdditionalAssemblies="new[] {typeof(SharedUI.Shared.MainLayout).Assembly}">
Open the index.html file within the wwwroot folder. We have to use a special syntax to reference files that are now in the shared project. This structure is _content/SharedProject/FilePath. This means the CSS links need to be changed as follows:
<link href="_content/SharedUI/css/bootstrap/bootstrap.min.css" rel="stylesheet" />
<link href="_content/SharedUI/css/app.css" rel="stylesheet" />
Remove the css and sample-data from the wwwroot folder.
Run the project, and it should load correctly, using the components from the Shared project:

Setting up the MAUI Blazor project
Delete the Data, Pages, Shared and _Imports.razor files and folders from the MAUI Blazor project:

Add a project reference to the Razor Class Library.
Open the Main.razor file. Add the following statements to the top of it:
@using Microsoft.AspNetCore.Components.Routing
@using Microsoft.AspNetCore.Components.Web
@using SharedUI.Shared;
Modify the <Router> opening element to add an additional assembly, with a reference to the MainLayout file in the shared project.
<Router AppAssembly="@typeof(App).Assembly"
        AdditionalAssemblies="new[] {typeof(SharedUI.Shared.MainLayout).Assembly}">
Open the index.html file within the wwwroot folder. We have to use a special syntax to reference files that are now in the shared project. This structure is _content/SharedProject/FilePath. This means the CSS links need to be changed as follows:
<link href="_content/SharedUI/css/bootstrap/bootstrap.min.css" rel="stylesheet" />
<link href="_content/SharedUI/css/app.css" rel="stylesheet" />
Remove the css folder from the wwwroot folder.
In the MauiProgram.cs file, remove the builder.Services.AddSingleton<WeatherForecastService>(); line as well as the using MauiUI.Data; reference.
You should now be able to run the project, which is referencing the Shared project’s components.

You can use this as a starting point for a future project where you intend to use a shared Blazor UI layer for both a browser-based WASM and MAUI application. Instead of following these steps, you can also download the solution from GitHub and continue from there.